Search This Blog
Lab Supplies
The Ultimate Guide For Creating and Editing Inspirational Pictures
So you wanna make inspirational pictures like the ones I post on this blog? To do this you'll need 3 basic skills:
1. searching capabilities on the net (to find those interesting pictures).
2. photoshop capabilities (you'll need to learn some useful shortcuts).
3. copywriting capabilities (to be able to write something surprising and funny about the picture).
searching capabilities
So, first of all things you'll need an interesting picture to work with, I wont give you a list of all the sites I use for the search process cause you probably know all of them (ie google images, Flickr,picsearch...) Instead I'll try to suggest what to look for. First of all try not using too obvious picture (ie picture from funny pictures site) because those pictures don't need any interpretation.. Instead try to find a "real life" picture with a subtle twist. To find those pictures I recomend usin search keywords such as "drunk" (drunk people always do something funny) or "arab" (what seems to foreign cultures normal can be funny to us). You can also take a diferent angle and search for "war" and use with it black humor.. for short, be creative...
photoshop capabilities
Now when you have your desired picture you'll need to edit it in photoshop for the format I use on this site and add funny\sarcastic captions to it. I'll show you the fastest way to do it with all the necessary shortcut keys which by the are useful in general and not only for this project.
So let's begin:
Ctrl + "O" to open the image
Now you have the backgroud layer with the image but we can't work with it, so lets duplicate the layer in order to work with the copied layer. Simly Drag the background layer on the "new layer" icon:
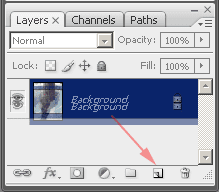
Now (1) Hide the original layer by clicking the eye symbol (it will disappear) and (2) choose the copied layer to work with:
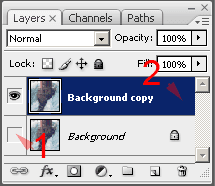
Now let's start working with the image, first do all we'll make a room for the captions' to do that we nee to expand the canvas so we'll have margins that border the image and provide room for the captions. To do this Zoom Out a bit by pressing ALT + Turn Mouse wheel backward (Thats will enable you later to see the new margins). Now press Alt + Ctrl + "C" to bring up the canvas size dialog. Make sure to uncheck the Relative Check Box so you can tune the width and height separately. I usually select 120% for the width and 140% for the height (I prefer working with percentages because it's constant for different image dimensions) you can choose what ever looks nice to you and press the "OK" button to apply it (you can always press Ctrl + "Z" to undo the last action or Ctrl + Alt + "Z" to undo several actions)
Now Press "V" to select "Move Tool" and Move the Image with the Arrow Keys (or Spacebar + Drag) to the best place and press Ctrl + Click "Layer Icon" to select layer transpaeancy:
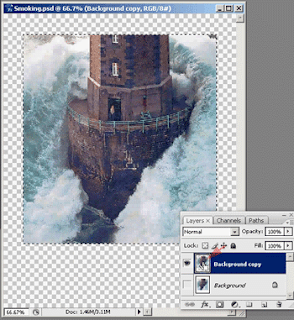
Now we want to pain all the transparent area outside the selection in black, to do this press Ctrl + Shift + "I" to Inverse the selection, than press "D" to load black as foreground color and white as background color. Now press Alt + Backspace to fill the selection area with the foreground color (Black):
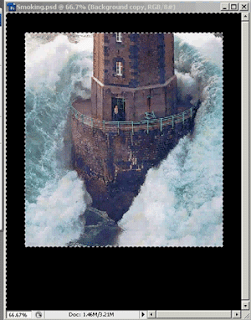
Now we want a nice rectangle white frame around the picture with small black space between the fram and the picture, to do this press Ctrl + Shift + "I" (Inverse selection), Now to expand alittle bit the selection press from the menu bar "Selection" -> "Modify" -> "Expand", from the expand dialog box choose a value (I usualy pick a value between 4-8) and press "OK". Now press Ctrl + Shift + "I" to inverse the new selection area And Ctrl + "I" to inverse the new selection area color from black to white:
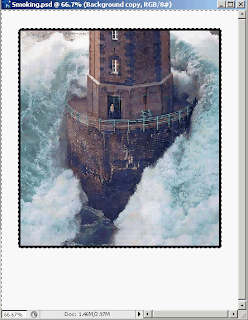
Now repeat again the same procces we just did from the last paragraph to get this:
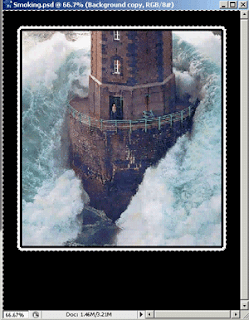
Now all we have to do is to deselect the selection area (press Ctrl + D) and using the Text tool (press "T") to add our captions, the text shold be white because of the black background, here are some more usfull shortcuts:
"X" (Before you add text) : Switch between forground and background colors so the black forground become white.
Ctrl + A : Allows you selext all the text before you apply any changes to it.
Spacebar (without releasing): Temporary Change the Text Tool (Or any other tool) to the Hand tool so you can drag the text to a diferant position.
Ctrl + Shift + Alt + "<" or ">" : Reduce or Enlarge the selected text.
Ctrl + Enter :Getting out of edit text mode (Enter alone will just take you one sentance down).
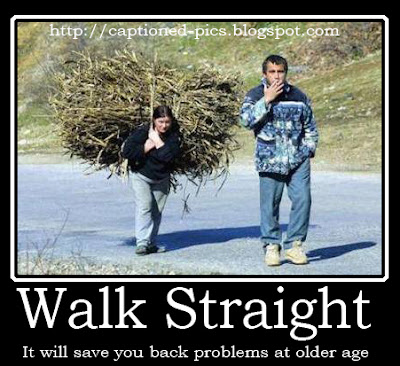
Here is the final result:
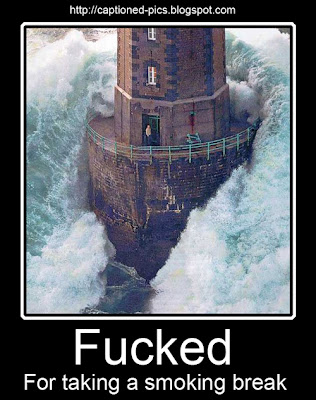
I know this procces looks long, but belive me, after little practice it's realy quick, I manage to do it in about one minute..
Good Luck
1. searching capabilities on the net (to find those interesting pictures).
2. photoshop capabilities (you'll need to learn some useful shortcuts).
3. copywriting capabilities (to be able to write something surprising and funny about the picture).
In this article I will cover only the first 2 topics because the 3rd topic involving more talent and less technique, I cant tell you how to be funny :), the only thing I can advise you is to use your life experience and try to notice those funny\annoying events you ran into in life and use them.
searching capabilities
So, first of all things you'll need an interesting picture to work with, I wont give you a list of all the sites I use for the search process cause you probably know all of them (ie google images, Flickr,picsearch...) Instead I'll try to suggest what to look for. First of all try not using too obvious picture (ie picture from funny pictures site) because those pictures don't need any interpretation.. Instead try to find a "real life" picture with a subtle twist. To find those pictures I recomend usin search keywords such as "drunk" (drunk people always do something funny) or "arab" (what seems to foreign cultures normal can be funny to us). You can also take a diferent angle and search for "war" and use with it black humor.. for short, be creative...
photoshop capabilities
Now when you have your desired picture you'll need to edit it in photoshop for the format I use on this site and add funny\sarcastic captions to it. I'll show you the fastest way to do it with all the necessary shortcut keys which by the are useful in general and not only for this project.
So let's begin:
Ctrl + "O" to open the image
Now you have the backgroud layer with the image but we can't work with it, so lets duplicate the layer in order to work with the copied layer. Simly Drag the background layer on the "new layer" icon:

Now (1) Hide the original layer by clicking the eye symbol (it will disappear) and (2) choose the copied layer to work with:

Now let's start working with the image, first do all we'll make a room for the captions' to do that we nee to expand the canvas so we'll have margins that border the image and provide room for the captions. To do this Zoom Out a bit by pressing ALT + Turn Mouse wheel backward (Thats will enable you later to see the new margins). Now press Alt + Ctrl + "C" to bring up the canvas size dialog. Make sure to uncheck the Relative Check Box so you can tune the width and height separately. I usually select 120% for the width and 140% for the height (I prefer working with percentages because it's constant for different image dimensions) you can choose what ever looks nice to you and press the "OK" button to apply it (you can always press Ctrl + "Z" to undo the last action or Ctrl + Alt + "Z" to undo several actions)
Now Press "V" to select "Move Tool" and Move the Image with the Arrow Keys (or Spacebar + Drag) to the best place and press Ctrl + Click "Layer Icon" to select layer transpaeancy:

Now we want to pain all the transparent area outside the selection in black, to do this press Ctrl + Shift + "I" to Inverse the selection, than press "D" to load black as foreground color and white as background color. Now press Alt + Backspace to fill the selection area with the foreground color (Black):

Now we want a nice rectangle white frame around the picture with small black space between the fram and the picture, to do this press Ctrl + Shift + "I" (Inverse selection), Now to expand alittle bit the selection press from the menu bar "Selection" -> "Modify" -> "Expand", from the expand dialog box choose a value (I usualy pick a value between 4-8) and press "OK". Now press Ctrl + Shift + "I" to inverse the new selection area And Ctrl + "I" to inverse the new selection area color from black to white:

Now repeat again the same procces we just did from the last paragraph to get this:

Now all we have to do is to deselect the selection area (press Ctrl + D) and using the Text tool (press "T") to add our captions, the text shold be white because of the black background, here are some more usfull shortcuts:
"X" (Before you add text) : Switch between forground and background colors so the black forground become white.
Ctrl + A : Allows you selext all the text before you apply any changes to it.
Spacebar (without releasing): Temporary Change the Text Tool (Or any other tool) to the Hand tool so you can drag the text to a diferant position.
Ctrl + Shift + Alt + "<" or ">" : Reduce or Enlarge the selected text.
Ctrl + Enter :Getting out of edit text mode (Enter alone will just take you one sentance down).
Here is the final result:

I know this procces looks long, but belive me, after little practice it's realy quick, I manage to do it in about one minute..
Good Luck
Subscribe to:
Comments (Atom)


